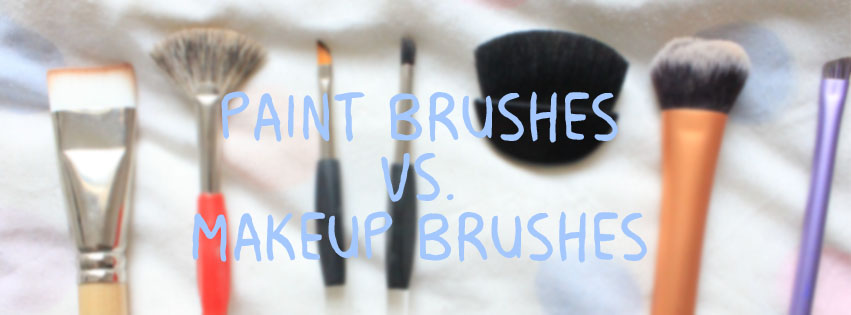
 Hi everyone! A few weeks back I bumped into two of my friends in a stationery shop in which my mum works in. We were just having a little catch up in front of the paint brushes and we started talking about how each paint brush looks strangely similar to high end makeup brushes. This got me thinking: can you actually replace high end makeup brushes which paint brushes which are 1/4 of the price? (Special mention to Chloe & Katrina for giving me the idea for this post, maybe you two should try it out next!) Eyebrows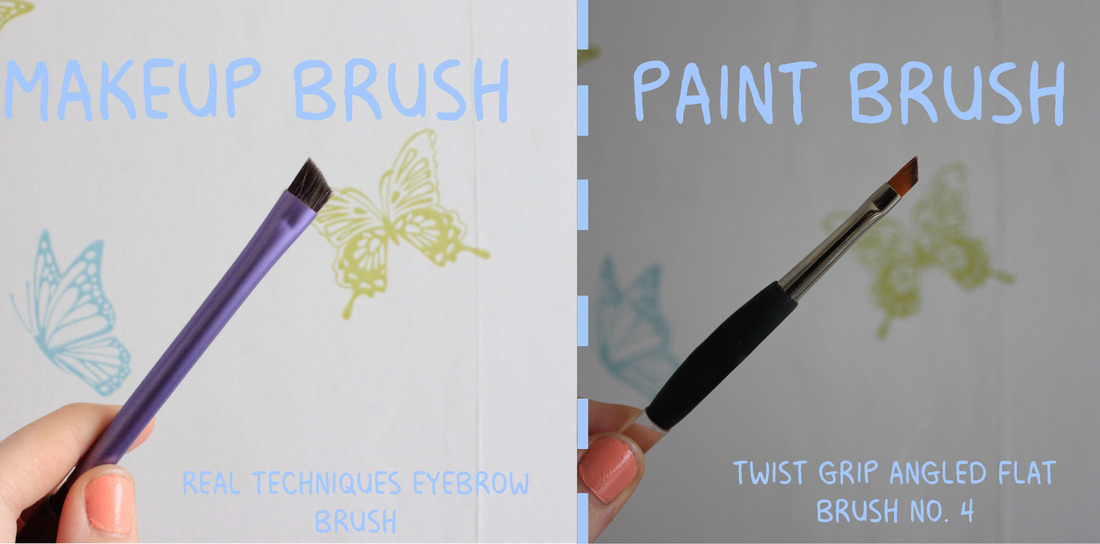 Just a quick note: I am AWFUL at my eyebrows and I try so hard to make them look "Instagram worthy" but it rarely goes that way! For my usual makeup routine I would normally use a Real Techniques brow brush with a comb on the other end. I use a mix of gel and powder for my brows and finish them off with brow gel (which I haven't done in the image above!) I found this angled paint brush which was sort of similar to my usual brush...so how did it look? 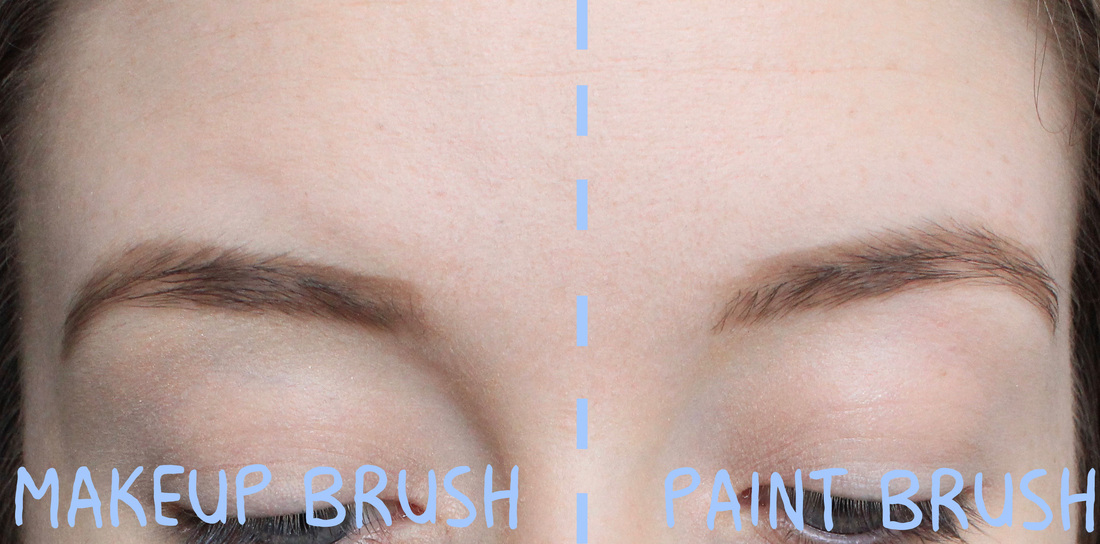 The paint brush worked rather well in my opinion! It was more fine with the brush I would usually use and if I was talented enough in makeup, it would be perfect for creating some extra hairs in the rather sparse spaces on my brows. Would I be using this brush again? Probably. Bronzer/Contour How does contouring even work?! I realise the shade I use isn't the right colour for my skin, but in all honesty I have NO idea how to match my pale skin with a contour colour - so if someone would like to point me in the right direction that would be fab! I rarely contour as I prefer to go for a more subtle look and my chubby cheeks are seen from miles off, so I'd rather use my free time of my morning routine to go eat some more breakfast. The brush I would normally use to contour (when I can be bothered) is one that comes with a Maybelline bronzing kit and then I would blend it out with a big fluffy brush. For the paint brush alternative, I picked up this Decopatch glue brush as it looked most similar to the brush which I would normally use! The results? 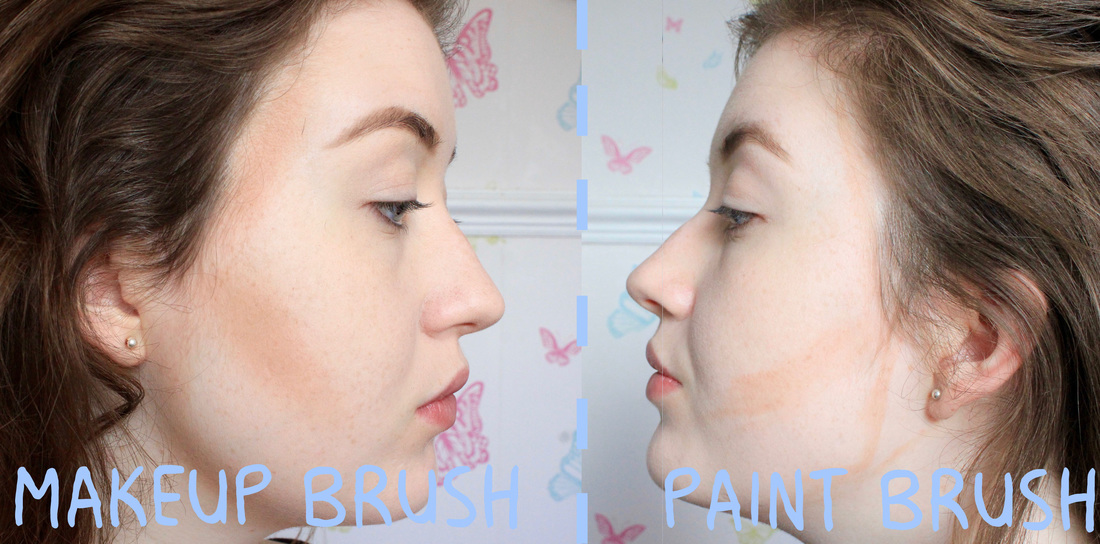 (Just to clarify I haven't blended the product to see how it would come out.) As you can tell the paintbrush was AWFUL in this situation. It couldn't pick up the product very well and the end was so fine that the lines were incredibly straight and it was a struggle to blend out. One bonus though: the brush is SUPER soft so I would love to find an alternative way to use this brush on my face. Highlighter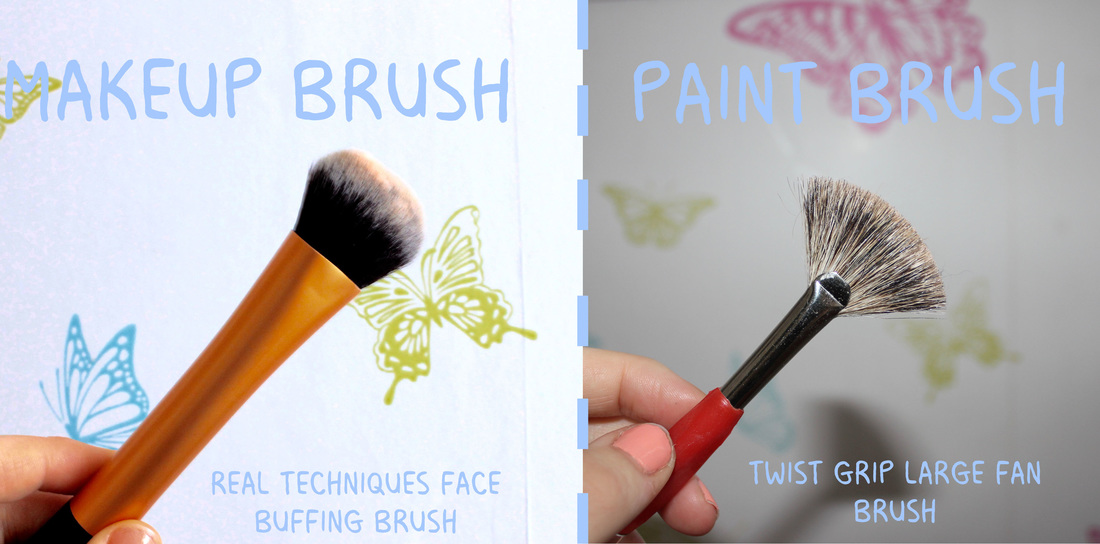 Again, highlighting isn't my forté and I actually didn't have a proper highlighting brush, so I would normally just use a Real Techniques buffing brush which I use to use for foundation. For the paintbrush I grabbed this twist grip fan brush to work as my highlighting tool. But did it work? 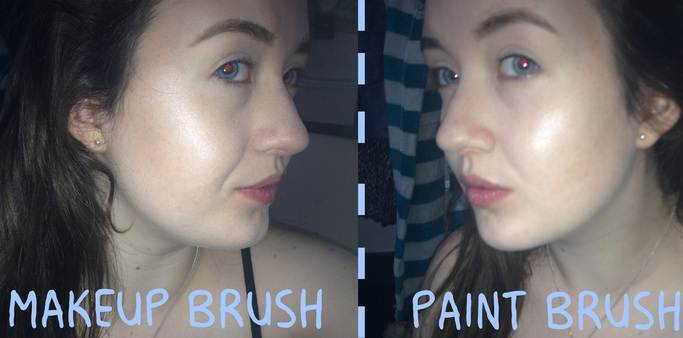 I feel like it works in a similar way as the brush I'm already using, so from above I see no difference! I will most likely be using the paintbrush and go back to using the other brush for foundation. One slight issue with the fan brush is that a lot of hairs did fall out during application and it was rather scratchy - so if you are going to use paint brushes I would soak them in oil beforehand! Eyeshadow/blending brush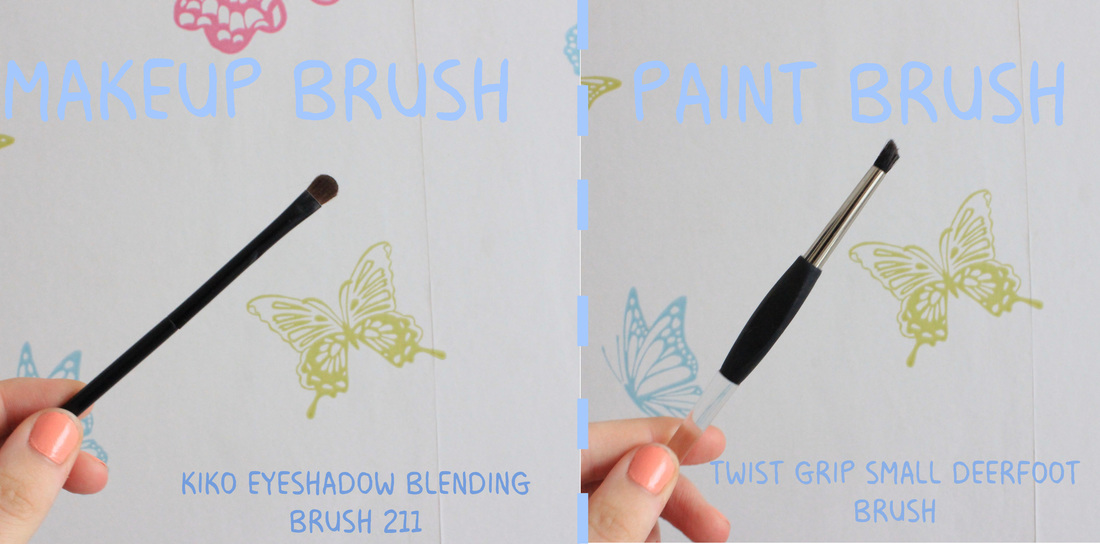 I absolutely adore blending eyeshadows when doing my makeup. It's fun to play with different colours and get different looks each time! I usually use a Kiko blending brush (number 211 if you're wondering) to get right in the crease of my eye and blend it out smoothly. For a paint brush alternative I will be using the twist grip deerfoot brush - did it work in the way I desired? 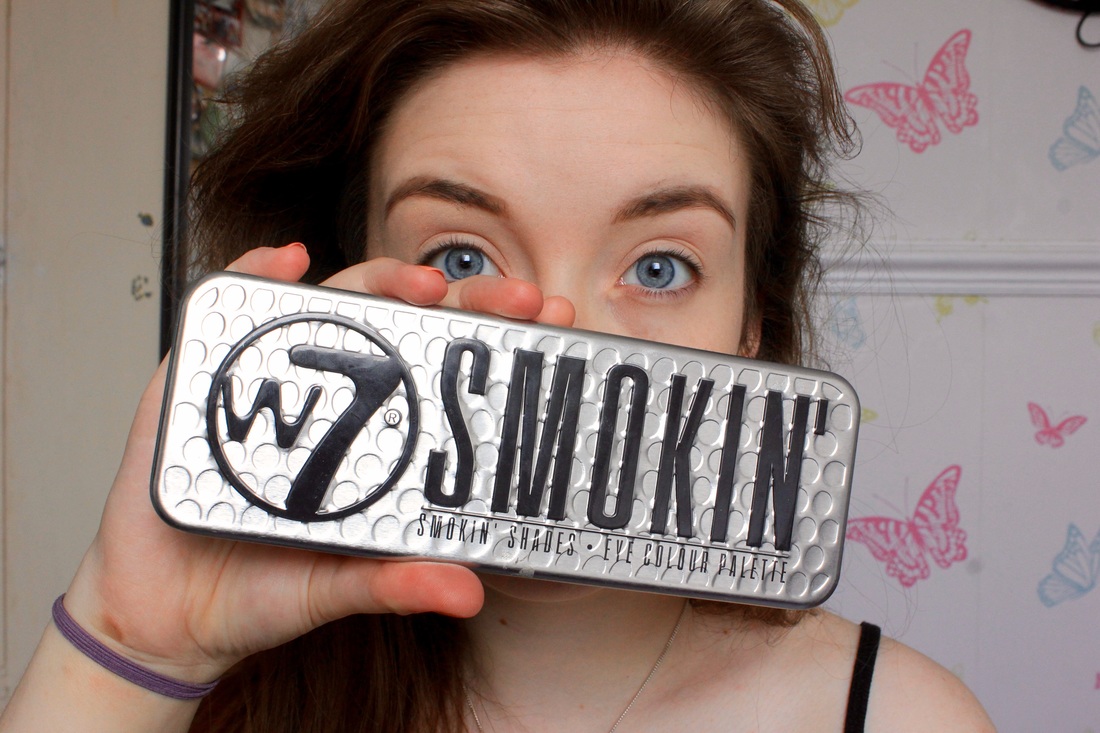 In this part I will be using the W7 Smokin' palette. 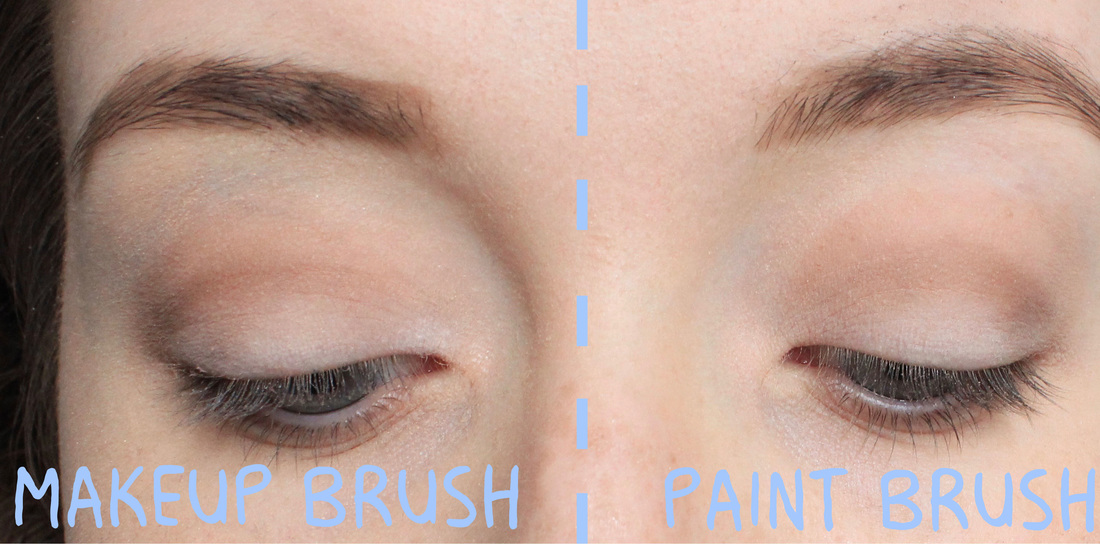 Other than scratching my eye horribly, it actually didn't do such a bad job! I've recently soaked this brush in oil to make it a lot softer. I probably wouldn't use this brush again as my blending brush is super soft and does the job a lot easier for me. If you are on a tight budget and would like to get your hands on some brushes, then I honestly do recommend looking into some of these alternativs in your local arts & crafts store. Since creating this post I have been using the fan brush and the angled brush as part of my morning routine! See you in the next blog post,   Hi everyone! Since having the opportunity to wear contact lenses everyday, it's given me more chances to try out different eyeshadow looks. Now, I feel like my eyes are small and I've always wanted to make them more noticeable by making my blue eyes brighten up a little bit. Sadly, this tip may not work with all eye colours - but do feel free to try it out! I watched a video back in the day on different eyeshadow looks for blue eyes and I've built up some idea to achieve the goal of what I want to get to... Brown eyeshadow/tonesSurprisingly, using brown eyeshadow really helps with bringing out the blue in your eyes. Using warmer tones of brown will make the eyes brighter and mainly warmer too. I recommend this warm shade from Kiko. It's warm tone and high pigment make it more noticeable on your eyelids. I like to blend these two Kiko shades together. 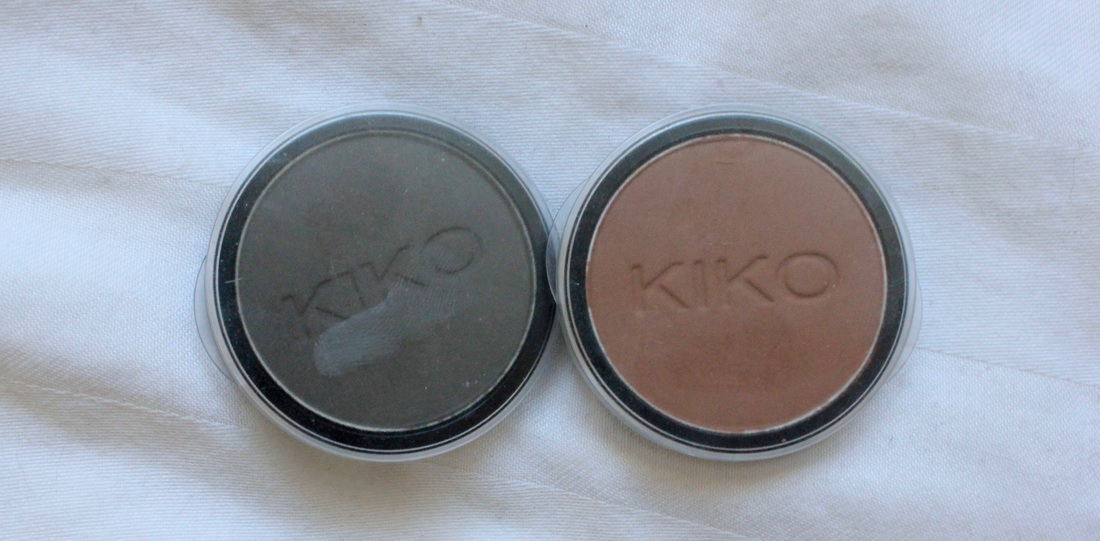 If you don't have a warm eyeshadow tone to hand, you can always use a bronzer instead. This Boujour Paris bronzer is a great shade to use to have the same effect as the above eyeshadow. 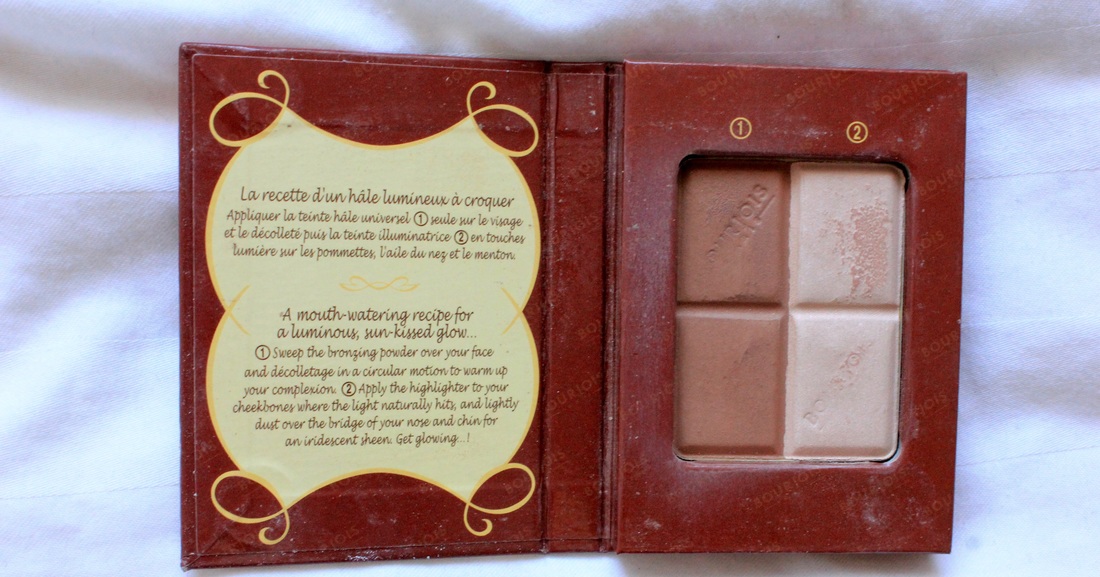 Using a dark brown shade on the outer corner and bringing it in, will make your eyes definitely more brighter in comparison. As the shade is darker it will contrast between the two colours: light meeting dark. To open up your eyes a bit more you can also put a shimmery light colour (or highlight) in the inner corner.   Can you guess which shade I like to use most? I like using neutral and nude tones in the crease of my eye. This emphasises the natural crease making your eye have more depth. Again, doing this makes my eyes look bigger. I prefer not to wear liquid eyeliner on top as that makes the eyes look a lot smaller as the black line dominates most of the eye. The occassion that I do wear eyeliner is most likely when I'm wearing false eyelashes (mainly for parties!) See you in the next blog post,   Hi everyone! How many times can I say skin in the title and in this post itself, I wonder? Summer is just around the corner and I am extremely excited for the sunshine to be out so that I can wear most of my wardrobe again! However, I have to be very careful during the summer months because I am very fair skinned. I don't tan - I burn! Over the years I have learnt my lesson on what suncream to use, how to ensure that my burn won't hurt the next day and what I can do to stop myself from burning! I want to share with you what you can do to keep your skin from burning and ensuring that you can get a tan that will last. *Any skin type can follow this method, I'm just doing it from a fair skin point of view* ExfoliatingBefore heading out for a day in the sun, exfoliate! This will lift all the dead skin cells (nice..) on your skin which will help with your tan lasting longer and your sun cream sink into your skin more and protect more layers! I reccommend only exfoliating at most twice a month. Exfoliating too much will expose your skin a lot more meaning burnt skin will become more common for you. Plus, you can exfoliate your hard earnt tan off so it's best to get rid of dead skin cells before heading out. Also, use a different exfoliator on your face. Face exfoliators are a bit more gentler on the skin and most do provide moisturising additions to their formula. For my face, I will either use a Nivea moisturising face wash with little exfoliating beads in the wash or if I want a deep cleanse I will use Kaeso face scrub. For the rest of my body, I use Lush's Rub Rub Rub shower scrub (which can also be used in your hair for extra volume!) (Here's a DIY scrub HERE if you can't get your hands on one!) 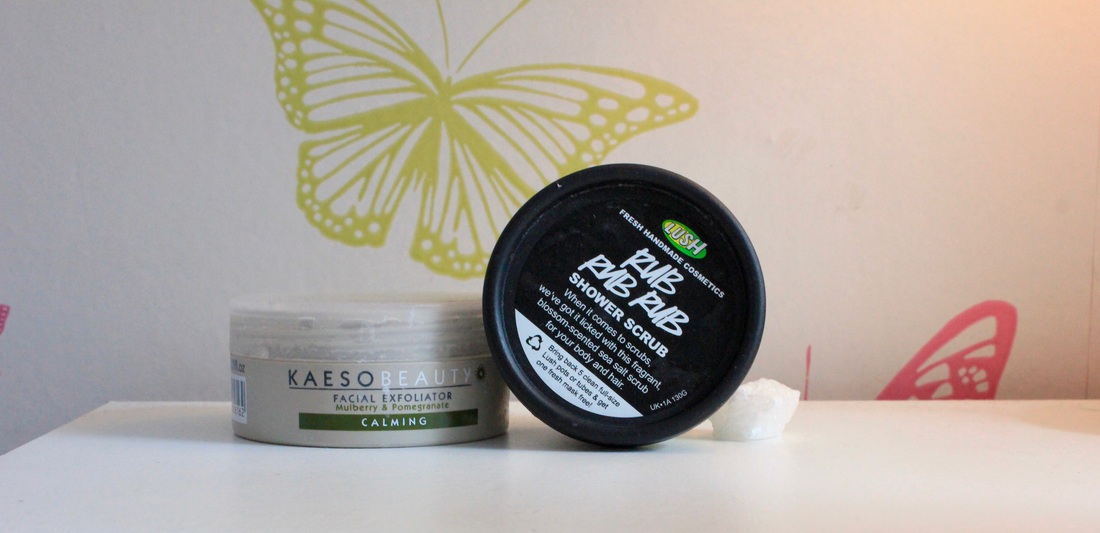
Moisturising & Sun CreamMost moisturisers provide an SPF addition in their creams which range around SPF 15 - 20. These are great as it protects your skin even more without you having to mix and match any cream products. As someone who is fair skinned, these creams are something I would use before putting on any makeup. However, on those really hot days I prefer to not wear any foundation on my skin. This is because I feel a lot more hotter and worry about my foundation dripping down my face (nice image there!) So this is where I take into account what protection I will put on my face before heading out. I firstly will put a high SPF suncream on my face and neck (and my ears - they're always getting burnt!) This will either be SPF 30 or 50. Then on top I will put a day cream to moisturise my face which the suncream may fail in doing. Putting on a high SPF suncream before putting on any makeup and heading out means that I don't usually have to top up throughout the day, which can smudge any eyeshadow, eyebrow powder or foundation (if I'm wearing it!) Also, who doesn't love the smell of suncream?! For this I would use a sport spray suncream which is waterproof and sweatproof, and put a Nivea day cream on top. 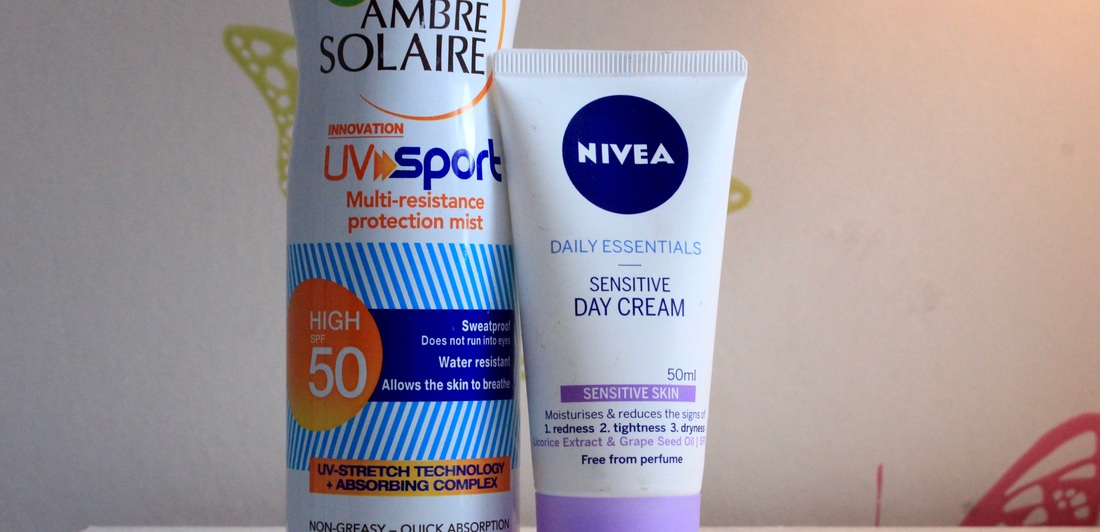 And there are my tips for protective skincare for the summer period. Please remember if you're going out to put on suncream, whether it's low SPF or high. It's better to be safe than sorry! See you in the next blog post,   Hi everyone! It's been a busy few weeks, but I'm back with another blog post for you all! I haven't posted a regime/make up look since 2 Christmas' ago, so it seemed rather fitting to share my current everyday makeup products and why I like using them. Also, I like knowing other peoples make up products, I'm quite nosey in some ways. I'm one to do things on the affordable side, I understand a pricier product will be better product, but if something is cheaper and works just as well, then why not buy that? Pre warning: this will most likely be a lengthy post as I will be blabbering on about different products. But, I've split my everyday look into: skincare, face, eyes, brows and lips. If you want to know "my face" then everything I currently use is below, enjoy reading! 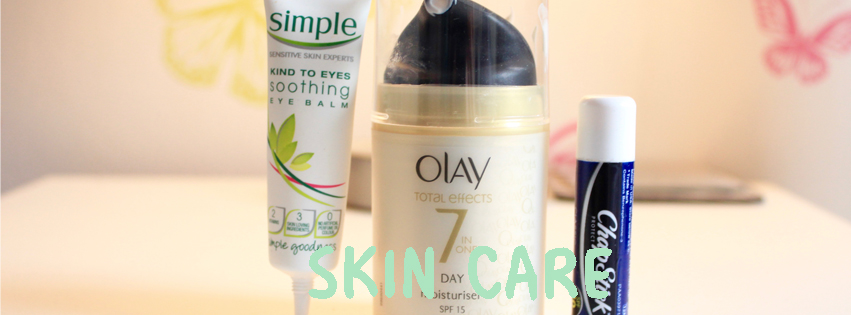 The start of my makeup regime is skincare. I've gone through countless moisturisers, eye creams and lip balms but these are my current go to's for my skin: Simple Kind to Eyes, Soothing Eye Balm: I have very "baggy" eyes, they're dark and big making them a challenge to cover the dark circles during my morning routine. This eye cream only really acts as a basic moisturiser, I haven't seen any results in me looking less tired - but it refreshes my half closed eyes in the morning that's for sure! Olay Total Effects: I know I am too young to be using anti ageing cream (prevention is key!) I find that this cream really works well with my skin. It brightens my complexion, has SPF for my pale skin and it even calms down my angry spots. I recently only use this on my face with no foundation as it makes my face feel great. Original Chapstick: Simple product, does what it should, sinks into my lips quickly with no residue - perfect! 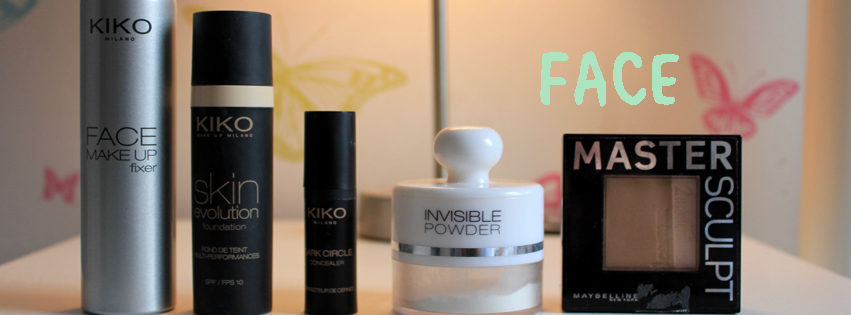 ...I really like Kiko currently if you can't tell. Kiko Face Make Up Fixer: Acts like a primer, but in a spray can! I put this on after my cream makeup product is on my face. It sets it in place and a great alternative if I don't want to use any primer. Kiko Skin Revolution Foundation: My current FAVOURITE foundation. It matches my pale complexion incredibly well and the thickness makes it last all day! Kiko Eye Dark Circle Concealer: I stupidly brought a warmer toned concealer for under my eyes, making me look more tired instead of making my eyes look brighter in the morning. It works as a usual concealer nothing too special - however one pump goes a long way! Kiko Invisible Powder: I like to use this powder on a night out as it holds everything in place. It's rare that I use it for daytime use anymore now that I have the make up fixer. The problem I have with this is that you have to blend it out really well otherwise in pictures you'll be able to see the powder on your face and you will look like a ghost (I mean I'm pale now, but I become a white sheet if I don't blend this properly!) Maybelline Master Sculpt Contour kit: If I'm feeling super fancy I will use bronzer to contour my face. However, I have no idea what I'm doing half the time and I either add too much or blend it too much making it a wasted piece of product! 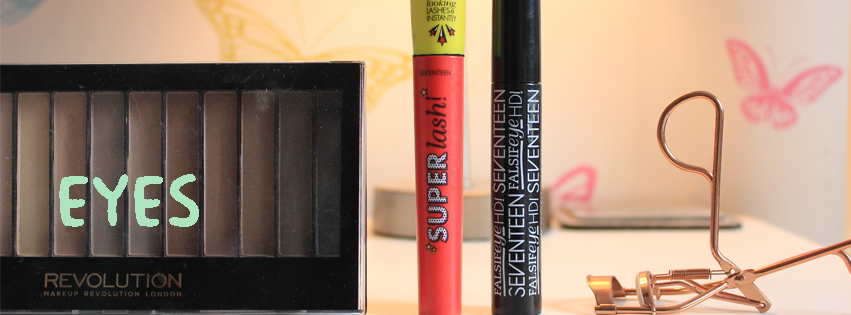 Revolution eyeshadow palette: I just use a cheapy eyeshadow palette and use the most neutral colours. I don't like using expensive eyeshadow everyday because it goes too quickly! This palette is okay, doesn't last all day but it does help with the subtle everyday look I like doing. Seventeen Super Lash mascara: I've written a whole review on this mascara here, it's become a bit old and tacky now and I've found that this makes my eyelashes separate a lot more by applying this first (grab your oldest mascara and use that as your base, trust me it helps!) Seventeen Falsifeye HD Lash: I also reviewed this a while ago, I still love this mascara to this day and I definitely recommend it to anyone! Eyelash curlers: I picked these up from TK Maxx, but you can get them anywhere. They've really helped open up my eyes in the morning so if you're looking for a brighter eye I would recommend trying an eyelash curler for great results. I can't go without using it in the morning now! 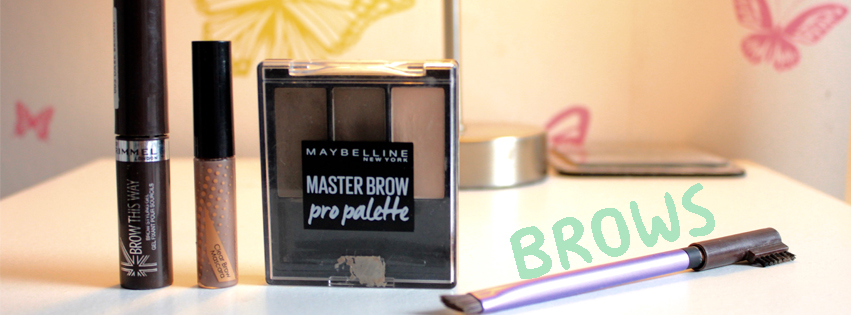 Ah brows...my nemesis. I'm currently at that awkward stage of brows - one doesn't need to be filled in whilst the other is trying its best to grow! *sigh* Brow This Way eyebrow gel: I use this gel before apply anything to my eyebrows. I find it makes the hairs more noticeable and tacky, creating the shape of brows I aim to have at the end of this very long process. Clear eyebrow gel: No idea where I got this from! The clear gel sets everything in place after I've filled in my brows, I really find it helps keep them in place all day. Maybelline Master Brow palette: This brow palette is my FAVOURITE thing ever. I've found it hard to find a brow powder that matches my hair colour and I think I've finally found it. It includes a gel like formula to create little hairs and a powder to fill in the gaps in my brows. The pink on the end is a highlighter for your brow bone. Such a bargain for such a great product! I either use the little brush to apply or I use my Real Techniques brow brush. 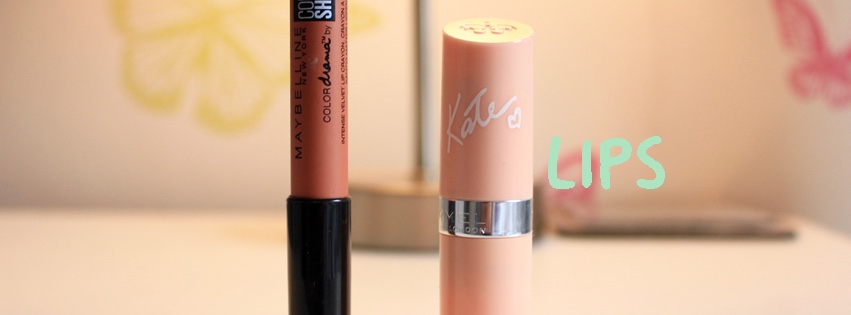 And now to the end of my regime - lipstick! I currently love very nude colours, completes my very plain look. I use either one or the other of these products above. Maybelline colour drama lip crayon: I love using crayons, they apply really well and I feel like I'm colouring in back when I was younger! The shade is a darker version of my lips, which makes it a bit different from my natural colour so you can notice it a bit more. Kate/Rimmel London lipstick: This is shade 45 of the Kate Moss lipstick line for Rimmel London. I brought shade 54, in reality I should've just thrown £6 down the drain as it is the exact same colour as my natural lip colour...I wasn't best pleased after I couldn't find the receipt! Shade 45 is a lot lighter and again more noticeable against my natural lip colour. And those are my current products I use everyday! I'm constantly changing which I use, I find that some products work better than others and I'm always one for trying out a new brand of makeup if I'm bored of my current products. See you in the next blog post,  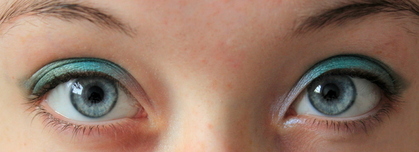
Hi everyone! Less than a week to go till Christmas! I'm not fully in the spirit yet - the weather has been so mild and warm I'm still waiting for snow! As most parties are held round this time of the year, I've decided to finally share this draft with you all as its a perfect eye makeup look which will suit all different colours (I've chosen green because Christmas trees!) Lets get into it: Preparation:To ensure all the colours will pop, cover your entire eyelids in a white eyeshadow base. This will also ensure that the eyeshadow will stay on for longer! Shopping list: • metallic shade eyeshadow x1 (in any colour of your choice) • matte eyeshadow x2 (in the same colour as your metallic) • silver eyeshadow x1 1.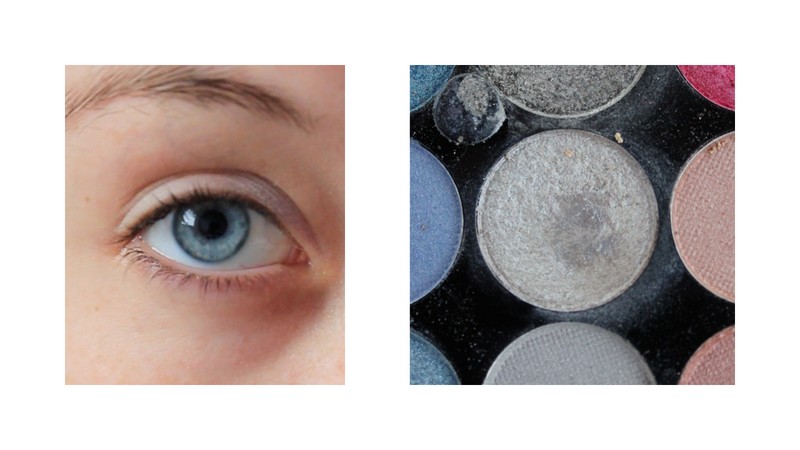 With the silver eyeshadow, put the colour on the your inner corner of you eye and spread across to the middle of your eyelid. 2.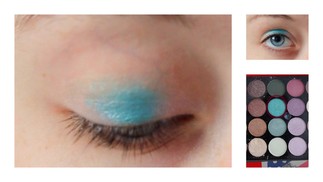 Taking the metallic shade of your choice (it doesn't have to be green!) spread it across your entire eyelid, but leave a little space on your outer corner of your eye. Blend the silver and metallic together to make the look more smooth. 3.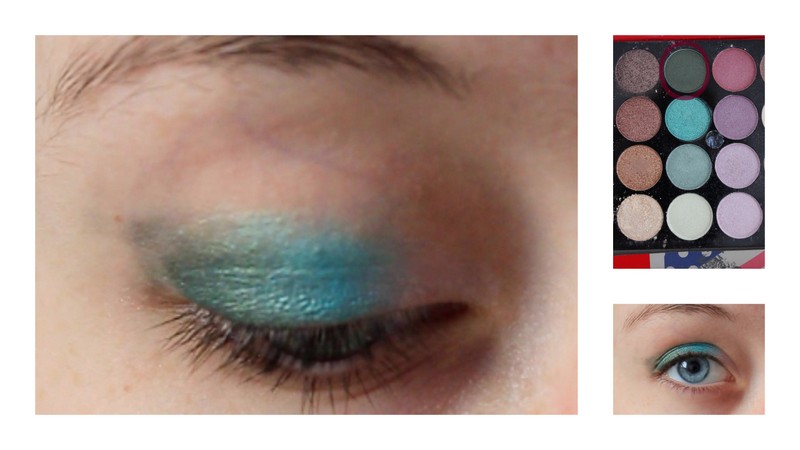 With the darkest matte shade, place the colour on the outer corner of your eyelid. To shake the look up a bit more, shape the darker shade into a triangle to add more emphasis to your eyes. 4.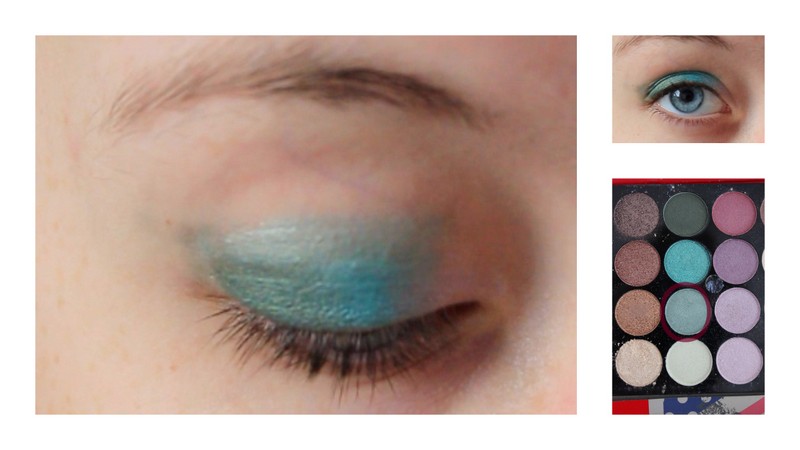 With your second matte shade (which should be fairly light) place that in the crease of your eye to add more depth to the look. Then you’re done! Add eyeliner and mascara and you have a full party look. So theres my Christmas party look! I love how colourful this eyeshadow style is and it suits every eye colour and you can use as many different colours as you wish! I hope you try this out and let me know what you think. See you in the next blog post, 
Hi everyone! Guess what? I'm ill for a second time in the past month! Once again, I have another cold which hasn't got too bad yet (thank goodness!) So, this weeks beauty/regime post is about tips and tricks that I like to use before and during the time that I come down with a cold. I live by these and as its getting colder as we enter winter very soon, I thought it would be a good idea to share these tips with you all so you know what to do when you get a dreaded cold! 1. You need Vitamin C!(I think I've heard the title in a TV programme before, it sounded familiar when I wrote it... )Anyways! Vitamin C helps you immune system doing its job and keeping you healthy. The best way you can get it (and how I get it) is tablet form. You can buy a pot of 60 tablets for just over a £1 in most stores! Take one of these a day and your body will be filled with Vitamin C goodness. But if you don't like the idea of having to take a tablet every day, you can get Vitamin C from certain juices and food! The best source of Vitamin C is quite clearly oranges! I like to drink fresh orange juice (without bits!) to get a Vitamin C boost! Or eating an orange will do the trick! 2. Lemon and honey drinkSore throat? You don't need a bunch of horrible tasting medicines to cure it! All you need is 2 teaspoons of manuka honey and juice of half a lemon and add some hot water. It tastes lovely and washes all your system out! The manuka honey is known for its health benefits and it does really help with this sort of problem! 3. SteamingBlocked nose? Easy! All you need to do is steam your face. That sounds incredibly weird right? Whenever I get a blocked nose I steam my face - it cleans out the sinuses and helps your nose clear. Not everyone has a steaming machine but not too worry you steam your face easily without any special equipment. Run the hot tap in your bathroom for around a minute then place a flannel underneath the running water until it is fully soaked (make sure it isn't too hot, but quite warm!) Then place the flannel over your nose or face and you should feel your nose becoming unblocked! I like to do this when I'm in the bath as you can relax a bit whilst the flannel is resting on your face! 4. Keep warm!This is probably the most simplest tricks which I do. I try and wrap up a bit when it gets colder as I feel I get ill more often when I'm freezing! Also, during the time that I'm ill I try to stay warm and comfy throughout the day - no one likes being cold and feeling rubbish at the same time! Sorry there were lack of pictures for this post - I just think that they didn't need images to explain what I'm on about! I hope these tricks help, and if you know any other tips when you come down with a cold - let me know as I want try new ideas out whilst I'm going through being ill! See you in the next blog post, 
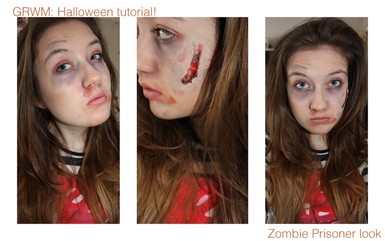 Hi everyone & Happy Halloween! I have been struggling so hard this year to find what to wear on Halloween this year and what I should go as! But literally a few days ago I finally got an outfit which then meant - how am I going to do my makeup?! Now I'm not one to spend ages on doing makeup for Halloween, so this is my fairly quick and easy tutorial. I am going to show a simple version of what I will be doing tonight and you can use this as well if you have no clue what to go as! Lets get into it! Step 1:Hi everyone!
I was looking at this page on my site and felt as if it need some more love! My last regime was back in April (as my first ever beauty post...yikes.) and I haven't done another regime in ages! So this post is my college morning routine. This is what I follow throughout the week from washing my face to applying that last coat of mascara. I hope you enjoy reading! Hi everyone! This is the first official 'beauty' type blog post on this site! Now, this is routine is based around what I do currently to keep my skin in a fairly good condition. Obviously, it always changes (as I buy new and different products) but for now, this routine has really helped!
My skin isn't the best, it is incredibly dry and I do gain a number of breakouts each month. I always try to tame the break outs and gain moisture in the skin & this leads to different products being tried and tested. If you struggle with break outs and dry skin (like me) I recommend this routine as it has really helped a lot! Now, lets get into the routine! BEWARE: my bare face has an appearance throughout... |
Archives
June 2018
Categories |

|
|
 RSS Feed
